共计 6247 个字符,预计需要花费 16 分钟才能阅读完成。
这篇文章主要介绍 Linux 与网络设备 GRE 如何配置,文中介绍的非常详细,具有一定的参考价值,感兴趣的小伙伴们一定要看完!
GRE 介绍及应用场景
GRE(General Routing Encapsulation),即通用路由封装,是一种三层技术。它的最大作用是可以对某些网络层协议的报文进行封装,如对路由协议、语音、视频等组播报文或 IPv6 报文进行封装。同时,也能够与 IPSec 结合,解决 GRE 的安全问题。
GRE 报文
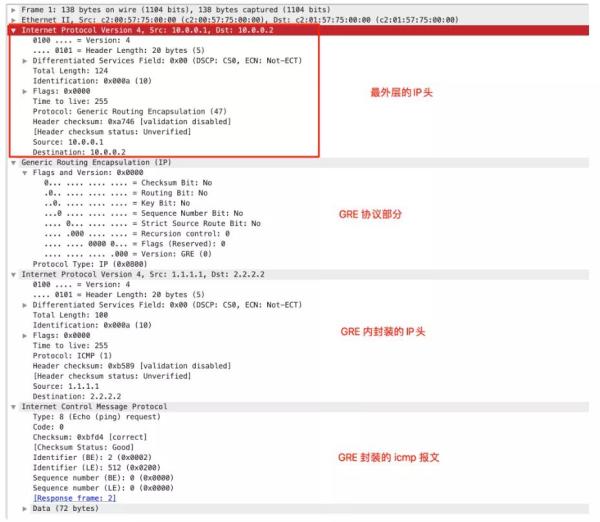
如下图所示,GRE 是按照 TCPIP 协议栈进行逐层封装,新的 IP 头会封装在原有的 IP 头中,然后运送出去,封装操作是通过 Tunnel 接口完成的,GRE 协议经过 Tunnel 口时,会将接口的封装协议设置为 GRE 协议。

GRE 的配置场景
CentOS 7.6 与 华为防火墙建立 GRE 隧道
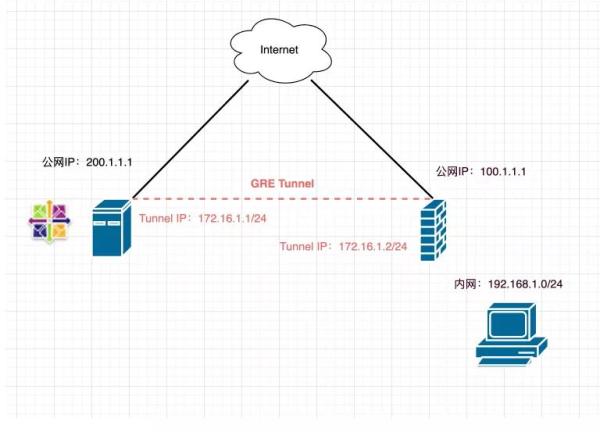
拓扑图

实现目标
CentOS 与 华为防火墙建立 GRE 隧道;
华为防火墙背后的内网网段 192.168.1.0/24 通过 GRE 隧道从 CentOS 到 Internet;
CentOS 配置端口映射,将 192.168.1.10 的 8080 端口映射到 CentOS 的公网地址 200.1.1.1 的 8080 端口。
配置
CentOS
配置接口与路由
[root@CentOS ~]# vim /etc/sysconfig/network-scripts/ifcfg-tun0 DEVICE=tun0 BOOTPROTO=none ONBOOT=yes DEVICETYPE=tunnel TYPE=GRE PEER_INNER_IPADDR=172.16.1.2 PEER_OUTER_IPADDR=100.1.1.1 MY_INNER_IPADDR=172.16.1.1 MY_OUTER_IPADDR=200.1.1.1 [root@CentOS ~]# vim /etc/sysconfig/network-scripts/route-tun0 192.168.1.0/24 via 172.16.1.2 [root@CentOS ~]# ifup tun0Iptables 配置
# 安装 iptables 管理服务 [root@CentOS ~]# yum install iptables-services # 在 INPUT 方向要放行对端的公网地址 [root@CentOS ~]# iptables -I INPUT -s 100.1.1.1/32 -j ACCEPT # 配置源地址转换 [root@CentOS ~]# iptables -t nat -A POSTROUTING -s 192.168.1.0/24 -j SNAT --to-source 200.1.1.1 # 端口映射 [root@CentOS ~]# iptables -t nat -A PREROUTING -d 200.1.1.1 -p tcp --dport 8080 -j DNAT --to-dest 192.168.1.10:8080 # 保存 iptables [root@CentOS ~]# service iptables save开启 ipv4 转发
[root@CentOS ~]# echo net.ipv4.ip_forward = 1 /etc/sysctl.conf [root@CentOS ~]# sysctl -p华为防火墙
本次以华为 USG6300E 系列防火墙为例:
配置接口,并添加到安全区域
interface Tunnel0 ip address 172.16.1.2 255.255.255.0 tunnel-protocol gre source 100.1.1.1 destination 200.1.1.1 # 将接口添加到安全区域内 [USG6300E] firewall zone tunnel firewall zone name tunnel set priority 75 add interface Tunnel0配置安全策略
在实际的实施中,可以将策略收紧一些,根据需求限制源和目的地址。
如果条件允许的话,可以先将默认安全策略设置为 permit,待调通之后,再修改安全策略:
security-policy rule name tunnel_out source-zone trust destination-zone tunnel action permit rule name tunnel_in source-zone tunnel destination-zone trust action permit # 放行 tunnel 到 untrust 的流量 rule name tunnel_untrust source-zone tunnel destination-zone untrust action permit配置策略路由
[USG6300E]policy-based-route # policy-based-route rule name PBR source-zone trust source-address 192.168.1.0 mask 255.255.255.0 action pbr egress-interface Tunnel0配置 No-NAT
设置去往隧道的流量不使用源地址转换:
[USG6300E-policy-nat]dis th nat-policy rule name SNAT source-zone tunnel destination-zone untrust source-address 192.168.1.0 mask 255.255.255.0 action no-nat验证
主要有如下几个测试方法:
鸿蒙官方战略合作共建——HarmonyOS 技术社区
在 CentOS 或 防火墙 ping 对端的隧道地址;
使用 192.168.1.0/24 网段内的设备 traceroute 公网地址,查看经过的路径以确认是否经过隧道转发。
Ubuntu 18 与 华为路由器建立 GRE 隧道
拓扑图

实现目标
Ubuntu 18 与华为路由器建立 GRE 隧道;
华为防火墙背后的内网网段 192.168.1.0/24 通过 GRE 隧道从 CentOS 到 Internet;
Ubuntu 配置端口映射,将 192.168.1.10 的 8080 端口映射到 CentOS 的公网地址 200.1.1.1 的 8080 端口。
配置
Ubuntu
netplan 配置
root@ubunt18demo:~# vim /etc/netplan/00-installer-config.yaml network: ethernets: ens3: addresses: - 200.1.1.1/24 gateway4: 200.1.1.254 nameservers: addresses: - 114.114.114.114 tunnels: tun0: mode: gre local: 200.1.1.1 remote: 100.1.1.1 addresses: [ 172.16.1.1/24 ] routes: - to: 192.168.1.0/24 via: 172.16.1.2 # 可以先执行 netplan try 验证一下,如果没有断掉的话可以按 ENTER 确认配置 # 如果和主机 SSH 中断,可以等待 120S 会自动恢复 root@ubunt18demo:~# netplay tryiptables 设置
Ufw 是 Ubuntu 的防火墙配置工具,底层还是调用 iptables 处理的:
# 启用 ufw ufw enable # 放行 SSH ufw allow ssh # 放行 GRE 对端进入的流量 ufw allow from 100.1.1.1/32 # 配置 nat 映射 iptables -t nat -A POSTROUTING -s 192.168.1.0/24 -j SNAT --to-source 200.1.1.1 iptables -t nat -A PREROUTING -d 200.1.1.1 -p tcp --dport 8080 -j DNAT --to-dest 192.168.1.10:8080 # 将 ufw 设置为开机自启动 systemctl enable ufw开启 ipv4 转发:
echo net.ipv4.ip_forward = 1 /etc/sysctl.conf sysctl -p华为路由器
以 AR1200 系列路由器为例:
配置接口
interface Tunnel0/0/1 ip address 172.16.1.2 255.255.255.0 tunnel-protocol gre source 100.1.1.1 destination 200.1.1.1配置策略路由
# 配置 ACL [AR1200] acl number 3000 [AR1200-acl-adv-3000] rule 10 permit ip destination 192.168.1.0 0.0.0.255 # 配置流分类 [AR1200] traffic classifier togretunnel [AR1200-classifier-togretunnel] if-match acl 3000 # 配置流行为 [AR1200] traffic behavior togretunnel [AR1200-behavior-togretunnel] redirect ip-nexthop 172.16.1.1 # 配置流策略 [AR1200] traffic policy togretunnel [AR1200-trafficpolicy-vlan10] classifier togretunnel behavior togretunnel # 在内网口调用流策略 [AR1200] interface gigabitethernet 1/0/1 [AR1200-GigabitEthernet3/0/0] traffic-policy togretunnel inbound验证
验证方法同 CentOS 与 华为防火墙建立 GRE 隧道一致。
Juniper SRX 防火墙的 GRE 配置
SRX 防火墙的出接口如果使用了 route-instances,那么配置 tunnel 口时,一定要注意增加 route-instance destination,如下所示:
set interfaces gr-0/0/0 unit 0 tunnel source 100.1.1.1 set interfaces gr-0/0/0 unit 0 tunnel destination 200.1.1.1 set interfaces gr-0/0/0 unit 0 tunnel routing-instance destination EXAMPLE-INSTANCE set interfaces gr-0/0/0 unit 0 family inet address 172.16.1.2/24另外策略路由在 SRX 中称为 FBF,还有 No-NAT 的配置示例如下:
# 配置 firewall filter,匹配需要进入隧道的流量 set firewall filter to-GreTunnel term 1 from source-address 192.168.1.0/24 set firewall filter to-GreTunnel term 1 then routing-instance EXAMPLE-INSTANCE set firewall filter to-GreTunnel term 3 then accept set routing-options rib-groups global import-rib EXAMPLE-INSTANCE.inet.0 # 配置去往 Gre Tunnel 的路由 set routing-instances EXAMPLE-INSTANCE instance-type forwarding set routing-instances EXAMPLE-INSTANCE routing-options interface-routes rib-group inet global set routing-instances EXAMPLE-INSTANCE routing-options static route 0.0.0.0/0 next-hop 172.16.1.1 # 在内网口调用 firewall filter set interfaces reth3 unit 0 family inet filter input to-GreTunnel # 去往隧道口的流量不做 SNAT set security nat source rule-set Gre-snat from zone Trust set security nat source rule-set Gre-snat to zone EXAMPLE-INSTANCE set security nat source rule-set Gre-snat rule to-cn2-no-nat match source-address 192.168.1.0/24 set security nat source rule-set Gre-snat rule to-cn2-no-nat match destination-address 0.0.0.0/0 set security nat source rule-set Gre-snat rule to-cn2-no-nat then source-nat offCentOS 的策略路由
如果有使用 Linux 作为中转的场景,也就是说华为防火墙和 Linux 建立 GRE 隧道,Linux 又和其他设备建立,由 Linux 做中转流量,这种场景下,可以在 Linux 配置策略路由,如下所示:
# 临时配置,重启后会消失,可以作为调试使用 ip rule add from 192.168.1.0/24 table 100 pref 10 ip route add 0.0.0.0/0 via 200.1.1.254 table 100 # 将配置持久化 vim /etc/sysconfig/network-scripts/rule-eth0 from 192.168.1.0/24 table 100 pref 10 vim /etc/sysconfig/network-scripts/route-eth0 default via 172.16.1.1 dev tun0 # 验证命令 ip rule show ip route show table 100以上是“Linux 与网络设备 GRE 如何配置”这篇文章的所有内容,感谢各位的阅读!希望分享的内容对大家有帮助,更多相关知识,欢迎关注丸趣 TV 行业资讯频道!

