共计 4747 个字符,预计需要花费 12 分钟才能阅读完成。
SpringCloud 微服务如何实现数据权限控制,相信很多没有经验的人对此束手无策,为此本文总结了问题出现的原因和解决方法,通过这篇文章希望你能解决这个问题。
举个例子:
有一批业务员跟进全国的销售订单。他们被按城市进行划分,一个业务员跟进 3 个城市的订单,为了保护公司的业务数据不能被所有人都掌握,故每个业务员只能看到自己负责城市的订单数据。所以从系统来讲每个业务员都有访问销售订单的功能,然后再需要配置每个业务员负责的城市,以此对订单数据进行筛选。
要实现此功能有很多方法,如果系统中多个地方都需要类似的需求,那我们就可以将其提出来做成一个通用的功能。这里我介绍一个相对简单的解决方案,以供参考。
一、整体架构
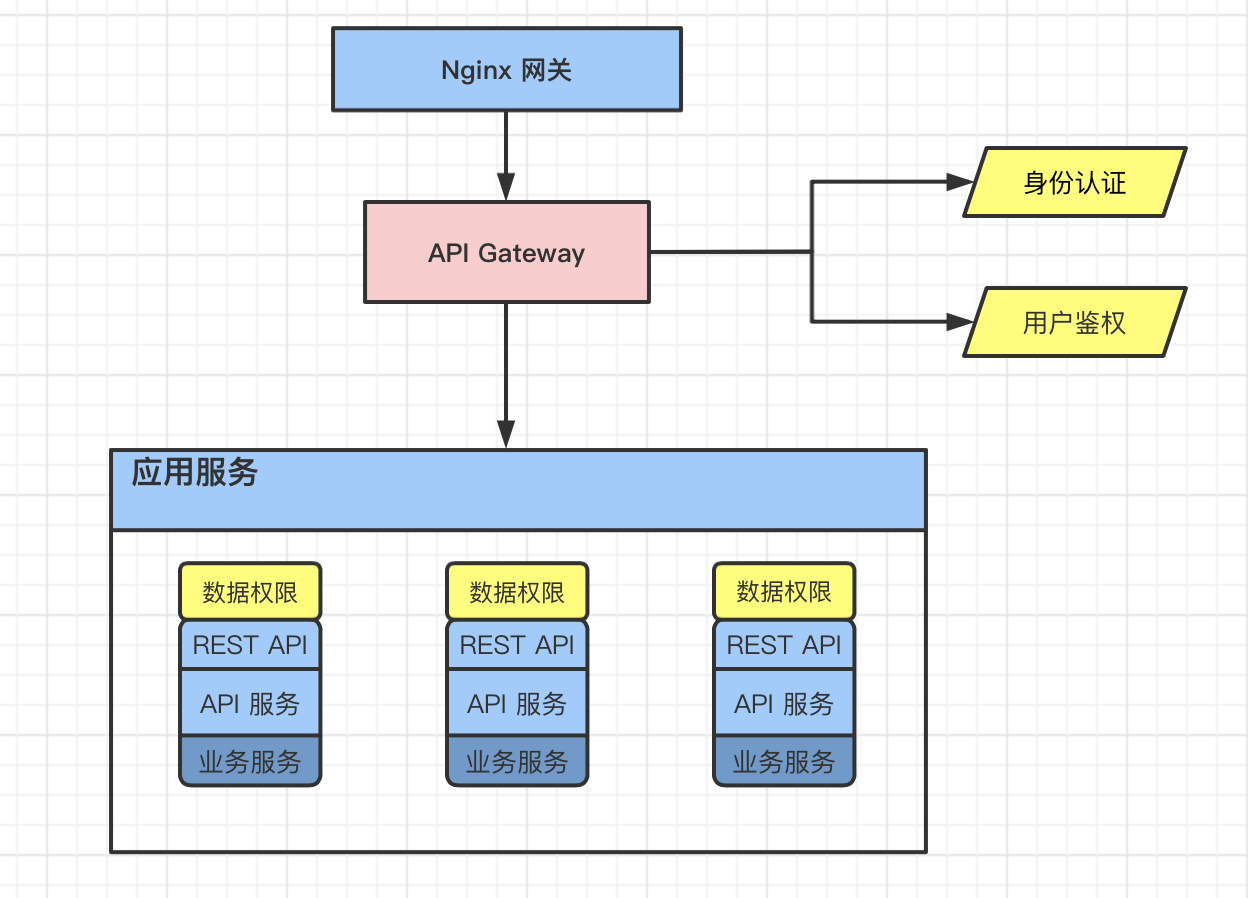
数据权限为作一个注解的形式挂在每一个需要数据权限控制的 Controller 上,由于和具体的程序逻辑有关故有一定的入侵性,且需要数据库配合使用。
二、实现流程

浏览器传带查询权限范围参数访问 Controller,如 cities
POST http://127.0.0.1:8000/order/query
accept: */*
Content-Type: application/json
token: 1e2b2298-8274-4599-a26f-a799167cc82f
{cities :[ cq , cd , bj], userName : string }
通过注解拦截权限范围参数,并根据预授权范围比较,回写在授权范围内的权限范围参数
cities = [cq , cd]通过参数传递到 DAO 层,在 SQL 语句中拼装出查询条件,实现数据的过滤
select * from order where city in (cq , cd)三、实现步骤 1. 注解实现
注解的完整代码,请详见源代码
1)创建注解
@Retention(value = RetentionPolicy.RUNTIME)
@Target(value = {ElementType.METHOD})
@Documented
public @interface ScopeAuth { String token() default  AUTH_TOKEN
 String scope() default
 String[] scopes() default {};}
此注解为运行时 RetentionPolicy.RUNTIME 作用在方法上 ElementType.METHOD 的
token:获取识别唯一用户的标识,与用户数据权限存储有关
scope,scopes:预请求的数据权限范围
2)AOP 实现注解
public class ScopeAuthAdvice {

 @Around(@annotation(scopeAuth) )
 public Object before(ProceedingJoinPoint thisJoinPoint, ScopeAuth scopeAuth) throws Throwable {
 // ...  省略过程
 //  获取 token
 String authToken = getToken(args, scopeAuth.token(), methodSignature.getMethod());
  //  回写范围参数
 setScope(scopeAuth.scope(), methodSignature, args, authToken);

 return thisJoinPoint.proceed();
 }
 /**
 *  设置范围
 */
 private void setScope(String scope, MethodSignature methodSignature, Object[] args, String authToken) {
 //  获取请求范围
 Set String  requestScope = getRequestScope(args, scope, methodSignature.getMethod());
 ScopeAuthAdapter adapter = new ScopeAuthAdapter(supplier);
 //  已授权范围
 Set String  authorizedScope = adapter.identifyPermissionScope(authToken, requestScope);
 //  回写新范围
 setRequestScope(args, scope, authorizedScope, methodSignature.getMethod());
 }
 /**
 *  回写请求范围
 */
 private void setRequestScope(Object[] args, String scopeName, Collection String  scopeValues, Method method) {
 //  解析  SPEL  表达式
 if (scopeName.indexOf(SPEL_FLAG) == 0) { ParseSPEL.setMethodValue(scopeName, scopeValues, method, args);
 }
 }
}
此为演示代码省略了过程,主要功能为通过 token 拿到预先授权的数据范围,再与本次请求的范围做交集,最后回写回原参数。
过程中用到了较多的 SPEL 表达式,用于计算表达式结果,具体请参考 ParseSPEL 文件
3)权限范围交集计算
public class ScopeAuthAdapter {
 private final AuthQuerySupplier supplier;
 public ScopeAuthAdapter(AuthQuerySupplier supplier) {
 this.supplier = supplier;
 }
 /**
 *  验证权限范围
 * @param token
 * @param requestScope
 * @return
 */
 public Set String  identifyPermissionScope(String token, Set String  requestScope) { Set String  authorizeScope = supplier.queryScope(token);
 String ALL_SCOPE =  AUTH_ALL
 String USER_ALL =  USER_ALL
 if (authorizeScope == null) {
 return null;
 }
 if (authorizeScope.contains(ALL_SCOPE)) {
 //  如果是全开放则返回请求范围
 return requestScope;
 }
 if (requestScope == null) {
 return null;
 }
 if (requestScope.contains(USER_ALL)){
 //  所有授权的范围
 return authorizeScope;
 }
 //  移除不同的元素
 requestScope.retainAll(authorizeScope);
 return requestScope;
 }
}
此处为了方便设置,有两个关键字范围
AUTH_ALL:预设所有范围,全开放的意思,为数据库预先设置值,请求传什么值都通过
USER_ALL:请求所有授权的范围,请求时传此值则会以数据库预设值为准
4)spring.factories 自动导入类配置
org.springframework.boot.autoconfigure.AutoConfigurationImportSelector=\
 fun.barryhome.cloud.annotation.ScopeAuthAdvice
如果注解功能是单独项目存在,在使用时有可能会存在找不到引入文件的问题,可通过此配置文件自动载入需要初始化的类
2. 注解使用
@ScopeAuth(scopes = { #orderDTO.cities}, token =  #request.getHeader(\ X-User-Name\) )
@PostMapping(value =  /query)
public String query(@RequestBody OrderDTO orderDTO, HttpServletRequest request) {return Arrays.toString(orderDTO.getCities());
}
在需要使用数据权限的 controller 方法上增加 @ScopeAuth 注解
scopes = {#orderDTO.cities}:表示取输入参数 orderDTO 的 cities 值,这里是表达式必须加 **#**
实际开发过程中,需要将 **orderDTO.getCities()** 带入后续逻辑中,在 DAO 层将此拼装在 SQL 中,以实现数据过滤功能
3. 实现 AuthStoreSupplier
AuthStoreSupplier 接口为数据权限的存储接口,与 AuthQuerySupplier 配合使用,可按实际情况实现
此接口为非必要接口,可由数据库或 Redis 存储(推荐),一般在登录的同时保存在 Redis 中
4. 实现 AuthQuerySupplier
AuthQuerySupplier 接口为数据权限查询接口,可按存储方法进行查询,推荐使用 Redis
@Component
public class RedisAuthQuerySupplier implements AuthQuerySupplier {
 @Autowired
 private RedisTemplate String, String  redisTemplate;
 /**
 *  查询范围
 */
 @Override
 public Set String  queryScope(String key) {
 String AUTH_USER_KEY =  auth:logic:user:%s
 String redisKey = String.format(AUTH_USER_KEY, key);
 List String  range = redisTemplate.opsForList().range(redisKey, 0, -1);
 if (range != null) { return new HashSet (range);
 } else {
 return null;
 }
 }
}
在分布式结构里,也可将此实现提出到权限模块,采用远程调用方式,进一步解耦
5. 开启数据权限
@EnableScopeAuth
@EnableDiscoveryClient
@SpringBootApplication
public class OrderApplication { public static void main(String[] args) { SpringApplication.run(OrderApplication.class, args);
 }
}
至此数据权限功能就实现了。在微服务器架构中为了实现功能的复用,将注解的创建和 AuthQuerySupplier 的实现提取到公共模块中,那么在具体的使用模块就简单得多了。只需增加 @ScopeAuth 注解,配置好查询方法就可以使用。
看完上述内容,你们掌握 SpringCloud 微服务如何实现数据权限控制的方法了吗?如果还想学到更多技能或想了解更多相关内容,欢迎关注丸趣 TV 行业资讯频道,感谢各位的阅读!


