共计 4552 个字符,预计需要花费 12 分钟才能阅读完成。
这篇文章主要介绍了 centos 中 Nginx 如何安装,具有一定借鉴价值,感兴趣的朋友可以参考下,希望大家阅读完这篇文章之后大有收获,下面让丸趣 TV 小编带着大家一起了解一下。
1、Nginx 服务介绍
nginx 是一个高性能的 HTTP Server 和代理软件,它具有高并发、且占用资源少,同时也是一个比较优秀的代理和负载均衡、缓存服务器,它可以运行于多种平台
官方网站:http://www.nginx.org
2、Nginx 的特点
Web 服务器
高性能的 WEB 服务器软件,与 Apache 相比,它支持更多的并发连接且占用服务器资源少,效率高
反向代理或负载均衡服务器
作为负载均衡服务器,它可以作为 HTTP SERVER 或 DB 等服务的代理服务器,类似 Haproxy 代理软件的功能,Nginx 的代理功能相对简单,效率也不及 Haproxy,同时它也是一个优秀的邮件代理服务软件
缓存服务器
Nginx 还可以作缓存服务器,类似于专业的缓存软件功能
3、Nginx 的优点
高并发:能支持 1 - 2 万甚至更多的并发连接(静态小文件)
内存消耗少
可以做 HTTP 反向代理——负载均衡的功能
内置对集群节点服务器的健康性查功能,不过功能相对较弱
通过 cache 插件可以实现缓存软件能够实现的功能
4、安装环境
[root@localhost ~]# cat /etc/redhat-release CentOS release 6.5 (Final)
[root@localhost ~]# uname -r 2.6.32-431.el6.x86_64
5、安装所需的 pcre 库
注:安装这个 pcre 库是为了让 nginx 支持 HTTP Rewrite 模块
创建一个专用的软件工具目录(实际生产环境中一定要养成好的规范习惯)
[root@localhost ~]# cd /download/tools/
下载 pcre 软件
wget ftp://ftp.csx.cam.ac.uk/pub/software/programming/pcre/pcre-8.38.tar.gz
编译安装
tar zxf pcre-8.38.tar.gz
cd pcre-8.38
./configure
make
make install
6、安装 Nginx
[root@centos6 tools]# useradd nginx -s /sbin/nologin -M
[root@centos6 tools]# wget http://nginx.org/download/nginx-1.10.1.tar.gz
[root@centos6 tools]# tar zxf nginx-1.10.1.tar.gz
[root@centos6 tools]# cd nginx-1.10.1
[root@centos6 nginx-1.10.1]# ./configure \
–user=nginx \
–group=nginx \
–prefix=/application/nginx-1.10.1 \
–with-http_stub_status_module \
–with-http_ssl_module
./configure: error: the HTTP rewrite module requires the PCRE library.
You can either disable the module by using –without-http_rewrite_module
option, or install the PCRE library into the system, or build the PCRE library
statically from the source with nginx by using –with-pcre= path option.
[root@centos6 nginx-1.10.1]# ./configure
–user=nginx \
–group=nginx \
–prefix=/application/nginx-1.10.1 \
–with-http_stub_status_module \
–with-http_ssl_module \
–with-pcre=/download/tools/pcre-8.38
注意这里不是安装后的目录,而是源码目录
[root@centos6 nginx-1.10.1]# make make install
7、启动服务
建立软件链接
[root@centos6 tools]# ln /application/nginx-1.10.1 /application/nginx
ln: `/application/nginx-1.10.1 : hard link not allowed for directory
看到了吧,这个提示是硬链接是不允许的
[root@centos6 tools]# ln -s /application/nginx-1.10.1 /application/nginx
[root@centos6 tools]# ll /application/nginx
lrwxrwxrwx. 1 root root 25 Nov 28 18:31 /application/nginx – /application/nginx-1.10.1
配置规范启动
[root@centos6 tools]# cd /application/nginx/conf/
[root@centos6 conf]# cp ../sbin/nginx /etc/init.d/
[root@centos6 conf]# /etc/init.d/nginx
[root@centos6 conf]# ps -ef|grep nginx
root 151771 0 18:33 ?00:00:00 nginx: master process /etc/init.d/nginx
nginx 15178 15177 0 18:33 ?00:00:00 nginx: worker process
root 15180 2340 0 18:33 pts/0 00:00:00 grep nginx
[root@centos6 conf]# lsof -i :80
COMMAND PID USER FD TYPE DEVICE SIZE/OFF NODE NAME
nginx 15177 root 6u IPv4 26905 0t0 TCP *:http (LISTEN)
nginx 15178 nginx 6u IPv4 26905 0t0 TCP *:http (LISTEN)
检查语法
[root@centos6 conf]# /application/nginx/sbin/nginx -t
nginx: the configuration file /application/nginx-1.10.1/conf/nginx.conf syntax is ok
nginx: configuration file /application/nginx-1.10.1/conf/nginx.conf test is successful
有的时候也会提示有错误
[root@localhost nginx-1.10.1]# /application/nginx/sbin/nginx -t /application/nginx/sbin/nginx: error while loading shared libraries: libpcre.so.1: cannot open shared object file: No such file or directory
出现错误提示 提示说明无法打开 libpcre.so.1 这个文件,没有这个文件或目录,出现这个提示的原因是因为在系统的 /etc/ld.so.conf 这个文件里没有 libpcre.so.1 的路径配置
解决方法如下:
[root@localhost nginx-1.10.1]# find / -name libpcre.so.1
/download/tools/pcre-8.38/.libs/libpcre.so.1
/usr/local/lib/libpcre.so.1
[root@localhost nginx-1.10.1]# vi /etc/ld.so.conf
include ld.so.conf.d/*.conf
/usr/local/lib
# 添加此路径即可
[root@localhost nginx-1.10.1]# ldconfig
#生效配置
重新检查语法
[root@localhost nginx-1.10.1]# /application/nginx/sbin/nginx -t nginx: the configuration file /application/nginx-1.10.1/conf/nginx.conf syntax is ok nginx: configuration file /application/nginx-1.10.1/conf/nginx.conf test is successful
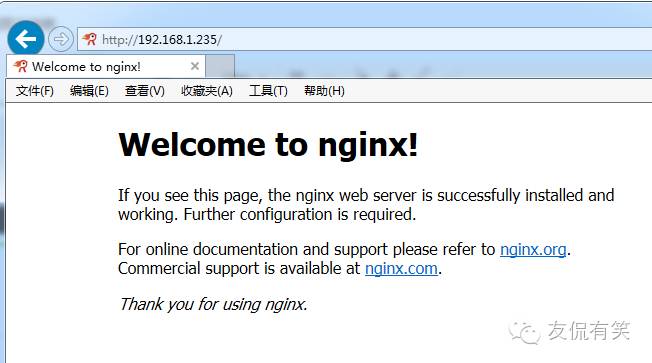
8、测试服务安装

看到这个界面表明安装是成功的
如果出现无法访问的现象可以从以下几个方面排错
1、防火墙是否关闭
2、与 WEB 服务器的联通性
3、selinux 是否为 disable
4、telnet 下 80 端口
5、查看错误日志记录进行分析问题所在
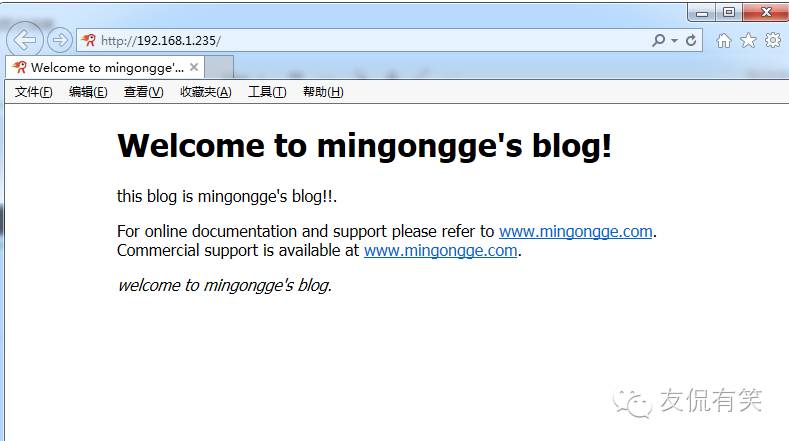
9、组建个简单页面测试
nginx 的站点目录如下
[root@centos6 conf]# cd /application/nginx/html/
[root@centos6 html]# ll
total 8
-rw-r–r–. 1 root root 537 Nov 28 18:29 50x.html
-rw-r–r–. 1 root root 612 Nov 28 18:29 index.html
[root@centos6 html]# cp index.html index.html.bak
[root@centos6 html]# vi index.html
!DOCTYPE html
html
head
title Welcome to mingongge s blog! /title
style
body {
width: 35em;
margin: 0 auto;
font-family: Tahoma, Verdana, Arial, sans-serif;
}
/style
/head
body
h2 Welcome to mingongge s blog! /h2
p this blog is mingongge s blog!!. /p
p For online documentation and support please refer to
a href= http://www.mingongge.com/ www.mingongge.com /a . br/
Commercial support is available at
a href= http://www.mingongge.com/ www.mingongge.com /a . /p
p em welcome to mingongge s blog. /em /p
/body
/html

至此 Nginx 服务安装与配置整个过程结束
感谢你能够认真阅读完这篇文章,希望丸趣 TV 小编分享的“centos 中 Nginx 如何安装”这篇文章对大家有帮助,同时也希望大家多多支持丸趣 TV,关注丸趣 TV 行业资讯频道,更多相关知识等着你来学习!

