共计 13187 个字符,预计需要花费 33 分钟才能阅读完成。
自动写代码机器人,免费开通
这篇文章主要介绍 MongoDB 中索引的示例分析,文中介绍的非常详细,具有一定的参考价值,感兴趣的小伙伴们一定要看完!
一、索引究竟是什么东西?
大部分开发者接触索引,大概知道索引类似书的目录,你要找到想要的内容,通过目录找到限定的关键字,进而找到对应的章节的 pageno,再找到具体的内容。
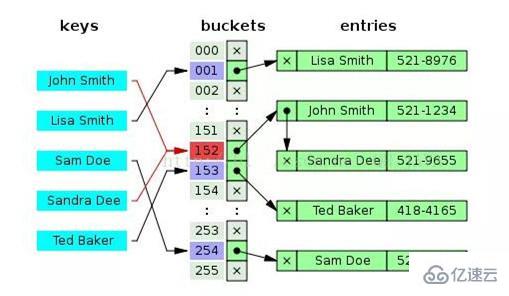
在数据结构里面,最简单的索引实现类似 hashmap,通过关键字 key,映射到具体的位置,找到具体的内容。但除了 hash 的方式,还有多种的方式实现索引。
(一)索引的多种实现方式以及特色
hash / b-tree / b+-tree
redis HSET / MongoDB PostgreSQL / MySQL
hashmap
一图见 b -tree b+-tree 差别:
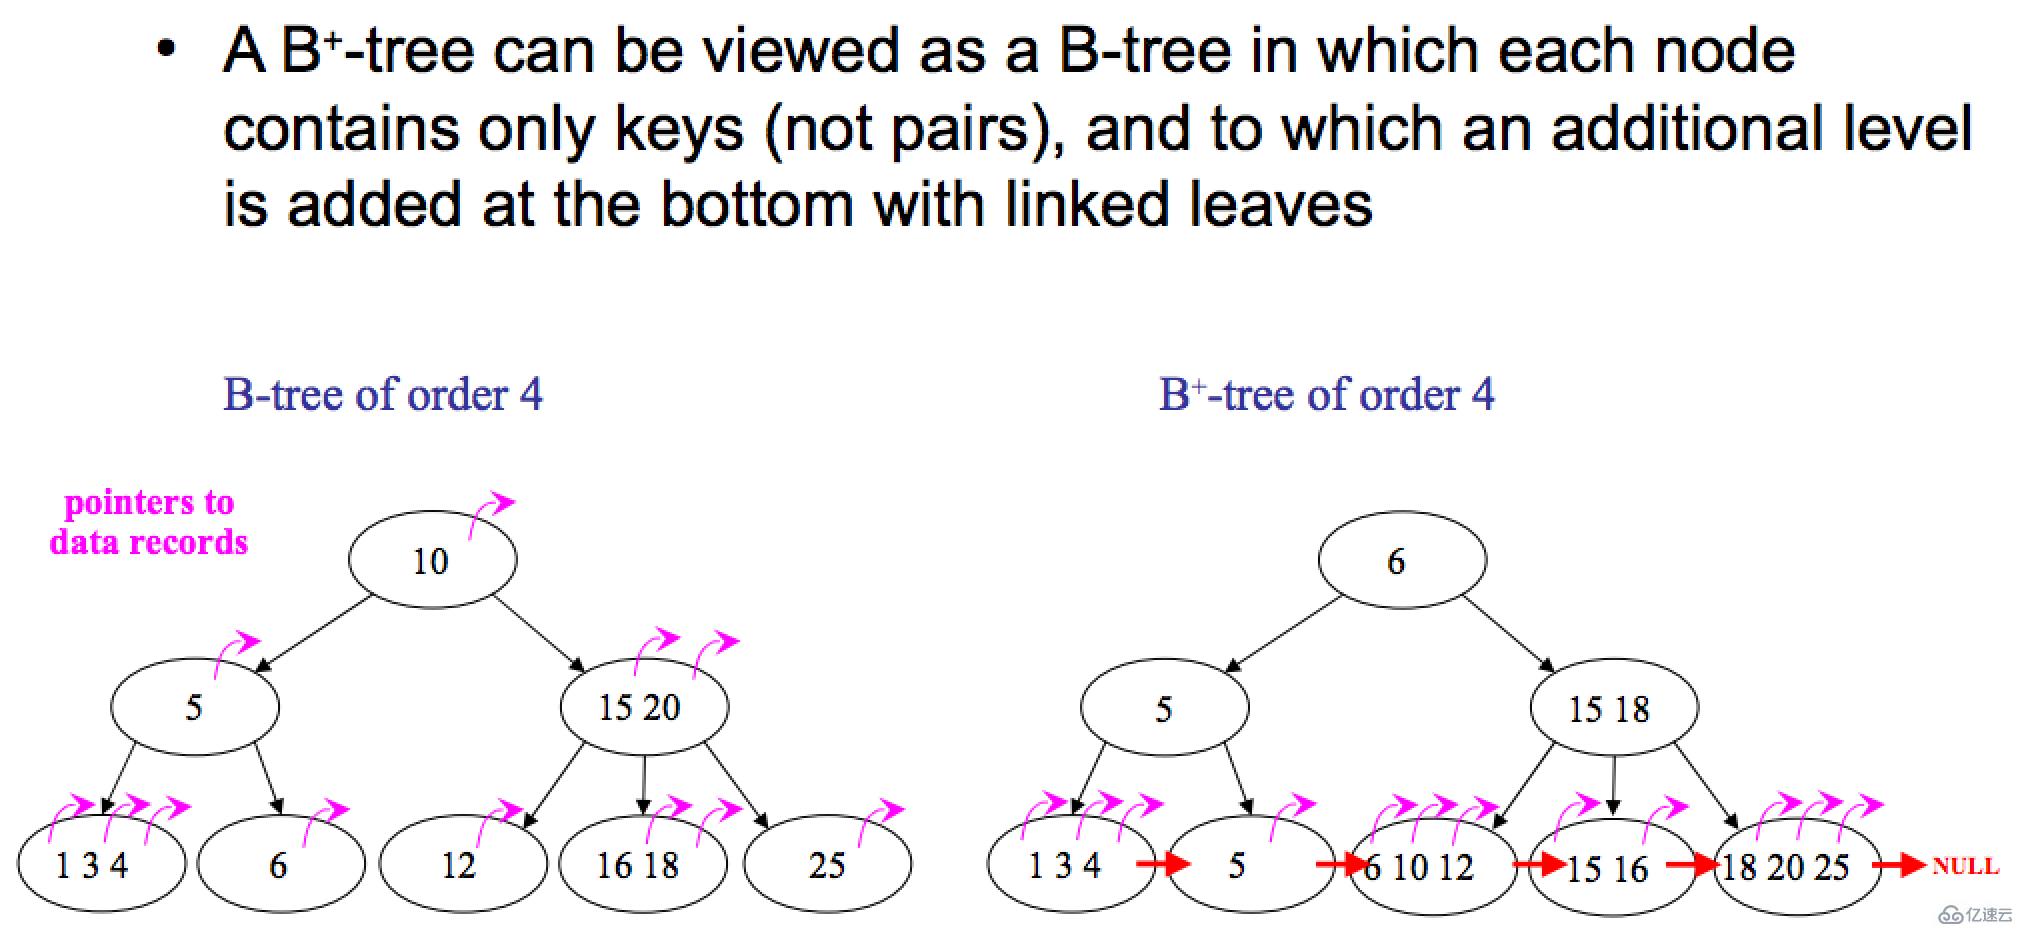
b+-tree 叶子存数据,非叶子存索引,不存数据,叶子间有 link
b-tree 非叶子可存数据
算法查找复杂度上来说:
hash 接近 O(1)
b-tree O(1)~ O(Log(n))更快的平均查找时间,不稳定的查询时间
b+ tree O(Log(n)) 连续数据,查询的稳定性
至于为何 MongoDB 的实现选择 b -tree 而非 b+-tree?
网上多篇文章有阐述,非本文重点。
(二)数据 索引的存储
 index 尽量存储在内存,data 其次。
注意只保留必要的 index,内存尽量用在刀刃上。
如果 index memory 都接近占满 memory,那么就很容易读到 disk,速度就下来了。
(三)知道索引的实现 存储原理后的思考
insert/update/delete 会触发 rebalance tree,所以,增删改数据,索引会触发修改,性能会有损耗,索引不是越多越好。既然如此,选哪些字段作为索引呢?当查询用到这些条件,怎么办?
拿一个最简单的 hashmap 来讲,为什么复杂度不是 O(1),而是所谓接近 O(1)。因为有 key 冲突 / 重复,DB 去找的时候,key 冲突的数据一大堆的话,还是得轮着继续找。b-tree 看键 (key) 的选择也是如此。
因此一个大部分开发经常犯的错就是对没有区分度的 key 建索引。例如:很多就只有集中类别的 type/status 的 documents count 达几十万以上的 collection,通常这种索引没什么帮助。
二、复合索引(一)复合索引不是越多越好
如果不想多建多余的索引,开发的同事在复合 单个字段选择上有时候挺纠结的。根据典型碰到的场景,来做几个实验:
这里创建了个 loans collection。简化只有 100 条数据。这个是借贷的表有 _id, userId, status(借贷状态), amount(金额).
db.loans.count()100
db.loans.find({  userId  :  59e022d33f239800129c61c7 ,  status  :  repayed , }).explain()
 queryPlanner  : {
 plannerVersion  : 1,
 namespace  :  cashLoan.loans ,
 indexFilterSet  : false,
 parsedQuery  : {
  $and  : [
 {
  status  : {
  $eq  :  repayed
 }
 },
 {
  userId  : {
  $eq  :  59e022d33f239800129c61c7
 }
 }
 ]
 queryHash  :  15D5A9A1 ,
 planCacheKey  :  15D5A9A1 ,
 winningPlan  : {
  stage  :  COLLSCAN ,
  filter  : {
  $and  : [
 {
  status  : {
  $eq  :  repayed
 }
 },
 {
  userId  : {
  $eq  :  59e022d33f239800129c61c7
 }
 }
 ]
 },
  direction  :  forward
 rejectedPlans  : [ ]
 serverInfo  : {
 host  :  RMBAP ,
 port  : 27017,
 version  :  4.1.11 ,
 gitVersion  :  1b8a9f5dc5c3314042b55e7415a2a25045b32a94
 ok  : 1
}
注意上面 COLLSCAN 全表扫描了, 因为没有索引。接下来我们分别建立几个索引。
step 1 先建立 {userId:1, status:1}
db.loans.createIndex({userId:1, status:1})
 createdCollectionAutomatically  : false,
 numIndexesBefore  : 1,
 numIndexesAfter  : 2,
 ok  : 1
}
db.loans.find({ userId : 59e022d33f239800129c61c7 , status : repayed , }).explain()
queryPlanner : {
plannerVersion : 1,
namespace : cashLoan.loans ,
indexFilterSet : false,
parsedQuery : {
$and : [
{
status : {
$eq : repayed
}
},
{
userId : {
$eq : 59e022d33f239800129c61c7
}
}
]
queryHash : 15D5A9A1 ,
planCacheKey : BB87F2BA ,
winningPlan : {
stage : FETCH ,
inputStage : {
stage : IXSCAN ,
keyPattern : {
userId : 1,
status : 1
},
indexName : userId_1_status_1 ,
isMultiKey : false,
multiKeyPaths : { userId : [ ],
status : [ ]
},
isUnique : false,
isSparse : false,
isPartial : false,
indexVersion : 2,
direction : forward ,
indexBounds : {
userId : [ [ 59e022d33f239800129c61c7 , 59e022d33f239800129c61c7]
],
status : [ [ repayed , repayed]
]
}
}
rejectedPlans : [ ]
serverInfo : {
host : RMBAP ,
port : 27017,
version : 4.1.11 ,
gitVersion : 1b8a9f5dc5c3314042b55e7415a2a25045b32a94
ok : 1
}结果:如愿命中 {userId:1, status:1} 作为 winning plan。
step2:再建立个典型的索引 userId
db.loans.createIndex({userId:1})
 createdCollectionAutomatically  : false,
 numIndexesBefore  : 2,
 numIndexesAfter  : 3,
 ok  : 1
}
db.loans.find({ userId : 59e022d33f239800129c61c7 , status : repayed , }).explain()
queryPlanner : {
plannerVersion : 1,
namespace : cashLoan.loans ,
indexFilterSet : false,
parsedQuery : {
$and : [
{
status : {
$eq : repayed
}
},
{
userId : {
$eq : 59e022d33f239800129c61c7
}
}
]
queryHash : 15D5A9A1 ,
planCacheKey : 1B1A4861 ,
winningPlan : {
stage : FETCH ,
inputStage : {
stage : IXSCAN ,
keyPattern : {
userId : 1,
status : 1
},
indexName : userId_1_status_1 ,
isMultiKey : false,
multiKeyPaths : { userId : [ ],
status : [ ]
},
isUnique : false,
isSparse : false,
isPartial : false,
indexVersion : 2,
direction : forward ,
indexBounds : {
userId : [ [\ 59e022d33f239800129c61c7\ , \ 59e022d33f239800129c61c7\]
],
status : [ [\ repayed\ , \ repayed\]
]
}
}
rejectedPlans : [
{
stage : FETCH ,
filter : {
status : {
$eq : repayed
}
},
inputStage : {
stage : IXSCAN ,
keyPattern : {
userId : 1
},
indexName : userId_1 ,
isMultiKey : false,
multiKeyPaths : { userId : [ ]
},
isUnique : false,
isSparse : false,
isPartial : false,
indexVersion : 2,
direction : forward ,
indexBounds : {
userId : [ [ 59e022d33f239800129c61c7 , 59e022d33f239800129c61c7]
]
}
}
}
serverInfo : {
host : RMBAP ,
port : 27017,
version : 4.1.11 ,
gitVersion : 1b8a9f5dc5c3314042b55e7415a2a25045b32a94
ok : 1
}留意到 DB 检测到 {userId:1, status:1} 为更优执行的方案.
db.loans.find({  userId  :  59e022d33f239800129c61c7  }).explain()
 queryPlanner  : {
 plannerVersion  : 1,
 namespace  :  cashLoan.loans ,
 indexFilterSet  : false,
 parsedQuery  : {
  userId  : {
  $eq  :  59e022d33f239800129c61c7
 }
 queryHash  :  B1777DBA ,
 planCacheKey  :  1F09D68E ,
 winningPlan  : {
  stage  :  FETCH ,
  inputStage  : {
  stage  :  IXSCAN ,
  keyPattern  : {
  userId  : 1
 },
  indexName  :  userId_1 ,
  isMultiKey  : false,
  multiKeyPaths  : {  userId  : [ ]
 },
  isUnique  : false,
  isSparse  : false,
  isPartial  : false,
  indexVersion  : 2,
  direction  :  forward ,
  indexBounds  : {
  userId  : [  [ 59e022d33f239800129c61c7 ,  59e022d33f239800129c61c7]
 ]
 }
 }
 rejectedPlans  : [
 {
  stage  :  FETCH ,
  inputStage  : {
  stage  :  IXSCAN ,
  keyPattern  : {
  userId  : 1,
  status  : 1
 },
  indexName  :  userId_1_status_1 ,
  isMultiKey  : false,
  multiKeyPaths  : {  userId  : [ ],
  status  : [ ]
 },
  isUnique  : false,
  isSparse  : false,
  isPartial  : false,
  indexVersion  : 2,
  direction  :  forward ,
  indexBounds  : {
  userId  : [  [ 59e022d33f239800129c61c7 ,  59e022d33f239800129c61c7]
 ],
  status  : [  [MinKey, MaxKey]
 ]
 }
 }
 }
 serverInfo  : {
 host  :  RMBAP ,
 port  : 27017,
 version  :  4.1.11 ,
 gitVersion  :  1b8a9f5dc5c3314042b55e7415a2a25045b32a94
 ok  : 1
}
留意到 DB 检测到 {userId:1} 为更优执行的方案,嗯~,如我们所料.
db.loans.find({  status  :  repayed  }).explain()
 queryPlanner  : {
 plannerVersion  : 1,
 namespace  :  cashLoan.loans ,
 indexFilterSet  : false,
 parsedQuery  : {
  status  : {
  $eq  :  repayed
 }
 queryHash  :  E6304EB6 ,
 planCacheKey  :  7A94191B ,
 winningPlan  : {
  stage  :  COLLSCAN ,
  filter  : {
  status  : {
  $eq  :  repayed
 }
 },
  direction  :  forward
 rejectedPlans  : [ ]
 serverInfo  : {
 host  :  RMBAP ,
 port  : 27017,
 version  :  4.1.11 ,
 gitVersion  :  1b8a9f5dc5c3314042b55e7415a2a25045b32a94
 ok  : 1
}
有趣的部分:status 不命中索引,全表扫描
接下来的步骤,加个 sort :
db.loans.find({  userId  :  59e022d33f239800129c61c7  }).sort({status:1}).explain()
 queryPlanner  : {
 plannerVersion  : 1,
 namespace  :  cashLoan.loans ,
 indexFilterSet  : false,
 parsedQuery  : {
  userId  : {
  $eq  :  59e022d33f239800129c61c7
 }
 queryHash  :  F5ABB1AA ,
 planCacheKey  :  764CBAA8 ,
 winningPlan  : {
  stage  :  FETCH ,
  inputStage  : {
  stage  :  IXSCAN ,
  keyPattern  : {
  userId  : 1,
  status  : 1
 },
  indexName  :  userId_1_status_1 ,
  isMultiKey  : false,
  multiKeyPaths  : {  userId  : [ ],
  status  : [ ]
 },
  isUnique  : false,
  isSparse  : false,
  isPartial  : false,
  indexVersion  : 2,
  direction  :  forward ,
  indexBounds  : {
  userId  : [  [ 59e022d33f239800129c61c7 ,  59e022d33f239800129c61c7]
 ],
  status  : [  [MinKey, MaxKey]
 ]
 }
 }
 rejectedPlans  : [
 {
  stage  :  SORT ,
  sortPattern  : {
  status  : 1
 },
  inputStage  : {
  stage  :  SORT_KEY_GENERATOR ,
  inputStage  : {
  stage  :  FETCH ,
  inputStage  : {
  stage  :  IXSCAN ,
  keyPattern  : {
  userId  : 1
 },
  indexName  :  userId_1 ,
  isMultiKey  : false,
  multiKeyPaths  : {  userId  : [ ]
 },
  isUnique  : false,
  isSparse  : false,
  isPartial  : false,
  indexVersion  : 2,
  direction  :  forward ,
  indexBounds  : {
  userId  : [  [ 59e022d33f239800129c61c7 ,  59e022d33f239800129c61c7]
 ]
 }
 }
 }
 }
 }
 serverInfo  : {
 host  :  RMBAP ,
 port  : 27017,
 version  :  4.1.11 ,
 gitVersion  :  1b8a9f5dc5c3314042b55e7415a2a25045b32a94
 ok  : 1
}
(二)其他尝试
有趣的部分:status 不命中索引
db.loans.find({  status  :  repayed , userId  :  59e022d33f239800129c61c7 , }).explain()
 queryPlanner  : {
 plannerVersion  : 1,
 namespace  :  cashLoan.loans ,
 indexFilterSet  : false,
 parsedQuery  : {
  $and  : [
 {
  status  : {
  $eq  :  repayed
 }
 },
 {
  userId  : {
  $eq  :  59e022d33f239800129c61c7
 }
 }
 ]
 queryHash  :  15D5A9A1 ,
 planCacheKey  :  1B1A4861 ,
 winningPlan  : {
  stage  :  FETCH ,
  inputStage  : {
  stage  :  IXSCAN ,
  keyPattern  : {
  userId  : 1,
  status  : 1
 },
  indexName  :  userId_1_status_1 ,
  isMultiKey  : false,
  multiKeyPaths  : {  userId  : [ ],
  status  : [ ]
 },
  isUnique  : false,
  isSparse  : false,
  isPartial  : false,
  indexVersion  : 2,
  direction  :  forward ,
  indexBounds  : {
  userId  : [  [\ 59e022d33f239800129c61c7\ , \ 59e022d33f239800129c61c7\]
 ],
  status  : [  [\ repayed\ , \ repayed\]
 ]
 }
 }
 rejectedPlans  : [
 {
  stage  :  FETCH ,
  filter  : {
  status  : {
  $eq  :  repayed
 }
 },
  inputStage  : {
  stage  :  IXSCAN ,
  keyPattern  : {
  userId  : 1
 },
  indexName  :  userId_1 ,
  isMultiKey  : false,
  multiKeyPaths  : {  userId  : [ ]
 },
  isUnique  : false,
  isSparse  : false,
  isPartial  : false,
  indexVersion  : 2,
  direction  :  forward ,
  indexBounds  : {
  userId  : [  [ 59e022d33f239800129c61c7 ,  59e022d33f239800129c61c7]
 ]
 }
 }
 }
 serverInfo  : {
 host  :  RMBAP ,
 port  : 27017,
 version  :  4.1.11 ,
 gitVersion  :  1b8a9f5dc5c3314042b55e7415a2a25045b32a94
 ok  : 1
}
命中索引,跟 query 的各个字段顺序不相关,如我们猜测。
有趣部分再来,我们删掉索引{userId:1}
db.loans.dropIndex({userId :1})
{  nIndexesWas  : 3,  ok  : 1 }
db.loans.find({userId  :  59e022d33f239800129c61c7 , }).explain()
 queryPlanner  : {
 plannerVersion  : 1,
 namespace  :  cashLoan.loans ,
 indexFilterSet  : false,
 parsedQuery  : {
  userId  : {
  $eq  :  59e022d33f239800129c61c7
 }
 queryHash  :  B1777DBA ,
 planCacheKey  :  5776AB9C ,
 winningPlan  : {
  stage  :  FETCH ,
  inputStage  : {
  stage  :  IXSCAN ,
  keyPattern  : {
  userId  : 1,
  status  : 1
 },
  indexName  :  userId_1_status_1 ,
  isMultiKey  : false,
  multiKeyPaths  : {  userId  : [ ],
  status  : [ ]
 },
  isUnique  : false,
  isSparse  : false,
  isPartial  : false,
  indexVersion  : 2,
  direction  :  forward ,
  indexBounds  : {
  userId  : [  [ 59e022d33f239800129c61c7 ,  59e022d33f239800129c61c7]
 ],
  status  : [  [MinKey, MaxKey]
 ]
 }
 }
 rejectedPlans  : [ ]
 serverInfo  : {
 host  :  RMBAP ,
 port  : 27017,
 version  :  4.1.11 ,
 gitVersion  :  1b8a9f5dc5c3314042b55e7415a2a25045b32a94
 ok  : 1
}
DB 执行分析器觉得索引{userId:1, status:1} 能更优, 没有命中复合索引,这个是因为 status 不是 leading field。
db.loans.find({  status  :  repayed  }).explain()
 queryPlanner  : {
 plannerVersion  : 1,
 namespace  :  cashLoan.loans ,
 indexFilterSet  : false,
 parsedQuery  : {
  status  : {
  $eq  :  repayed
 }
 queryHash  :  E6304EB6 ,
 planCacheKey  :  7A94191B ,
 winningPlan  : {
  stage  :  COLLSCAN ,
  filter  : {
  status  : {
  $eq  :  repayed
 }
 },
  direction  :  forward
 rejectedPlans  : [ ]
 serverInfo  : {
 host  :  RMBAP ,
 port  : 27017,
 version  :  4.1.11 ,
 gitVersion  :  1b8a9f5dc5c3314042b55e7415a2a25045b32a94
 ok  : 1
}
再换个角度 sort 一遍,与前面 query sort 互换,之前是:
db.loans.find({userId:1}).sort({ status : repayed })看看有啥不一样?
db.loans.find({  status  :  repayed  }).sort({userId:1}).explain()
 queryPlanner  : {
 plannerVersion  : 1,
 namespace  :  cashLoan.loans ,
 indexFilterSet  : false,
 parsedQuery  : {
  status  : {
  $eq  :  repayed
 }
 queryHash  :  56EA6313 ,
 planCacheKey  :  2CFCDA7F ,
 winningPlan  : {
  stage  :  FETCH ,
  filter  : {
  status  : {
  $eq  :  repayed
 }
 },
  inputStage  : {
  stage  :  IXSCAN ,
  keyPattern  : {
  userId  : 1,
  status  : 1
 },
  indexName  :  userId_1_status_1 ,
  isMultiKey  : false,
  multiKeyPaths  : {  userId  : [ ],
  status  : [ ]
 },
  isUnique  : false,
  isSparse  : false,
  isPartial  : false,
  indexVersion  : 2,
  direction  :  forward ,
  indexBounds  : {
  userId  : [  [MinKey, MaxKey]
 ],
  status  : [  [MinKey, MaxKey]
 ]
 }
 }
 rejectedPlans  : [ ]
 serverInfo  : {
 host  :  RMBAP ,
 port  : 27017,
 version  :  4.1.11 ,
 gitVersion  :  1b8a9f5dc5c3314042b55e7415a2a25045b32a94
 ok  : 1
}
如猜测,命中索引。
再来玩玩,确认下 leading filed 试验:
db.loans.dropIndex(userId_1_status_1)
{  nIndexesWas  : 2,  ok  : 1 }
db.loans.getIndexes()
v : 2,
key : {
id : 1
name : id_ ,
ns : cashLoan.loans
]db.loans.createIndex({status:1, userId:1})
createdCollectionAutomatically : false,
numIndexesBefore : 1,
numIndexesAfter : 2,
ok : 1
}db.loans.getIndexes()
v : 2,
key : {
id : 1
name : id_ ,
ns : cashLoan.loans
v : 2,
key : {
status : 1,
userId : 1
name : status_1_userId_1 ,
ns : cashLoan.loans
]db.loans.find({ status : repayed }).explain()
queryPlanner : {
plannerVersion : 1,
namespace : cashLoan.loans ,
indexFilterSet : false,
parsedQuery : {
status : {
$eq : repayed
}
queryHash : E6304EB6 ,
planCacheKey : 7A94191B ,
winningPlan : {
stage : FETCH ,
inputStage : {
stage : IXSCAN ,
keyPattern : {
status : 1,
userId : 1
},
indexName : status_1_userId_1 ,
isMultiKey : false,
multiKeyPaths : { status : [ ],
userId : [ ]
},
isUnique : false,
isSparse : false,
isPartial : false,
indexVersion : 2,
direction : forward ,
indexBounds : {
status : [ [ repayed , repayed]
],
userId : [ [MinKey, MaxKey]
]
}
}
rejectedPlans : [ ]
serverInfo : {
host : RMBAP ,
port : 27017,
version : 4.1.11 ,
gitVersion : 1b8a9f5dc5c3314042b55e7415a2a25045b32a94
ok : 1
}db.loans.getIndexes()
v : 2,
key : {
id : 1
name : id_ ,
ns : cashLoan.loans
v : 2,
key : {
status : 1,
userId : 1
name : status_1_userId_1 ,
ns : cashLoan.loans
]db.loans.find({userId : 59e022d33f239800129c61c7 , }).explain()
queryPlanner : {
plannerVersion : 1,
namespace : cashLoan.loans ,
indexFilterSet : false,
parsedQuery : {
userId : {
$eq : 59e022d33f239800129c61c7
}
queryHash : B1777DBA ,
planCacheKey : 5776AB9C ,
winningPlan : {
stage : COLLSCAN ,
filter : {
userId : {
$eq : 59e022d33f239800129c61c7
}
},
direction : forward
rejectedPlans : [ ]
serverInfo : {
host : RMBAP ,
port : 27017,
version : 4.1.11 ,
gitVersion : 1b8a9f5dc5c3314042b55e7415a2a25045b32a94
ok : 1
}看完这个试验,明白了 {userId:1, status:1} vs {status:1,userId:1} 的差别了吗?
PS:这个 case 里面其实 status 区分度不高,这里只是作为实例展示。
三、总结:
注意使用上、使用频率上、区分高的 / 常用的在前面;
如果需要减少索引以节省 memory/ 提高修改数据的性能的话,可以保留区分度高,常用的,去除区分度不高,不常用的索引。
学会用 explain()验证分析性能:
DB 一般都有执行器优化的分析,MySQL MongoDB 都是 用 explain 来做分析。
语法上 MySQL :
explain your_sql
MongoDB:
yoursql.explain()
总结典型:理想的查询是结合 explain 的指标,他们通常是多个的混合:
IXSCAN : 索引命中;
Limit : 带 limit;
Projection : 相当于非 select *;
Docs Size less is better ;
Docs Examined less is better;
nReturned=totalDocsExamined=totalKeysExamined;
SORT in index:sort 也是命中索引,否则,需要拿到数据后,再执行一遍排序;
Limit Array elements:限定数组返回的条数,数组也不应该太多数据,否则 schema 设计不合理。
以上是“MongoDB 中索引的示例分析”这篇文章的所有内容,感谢各位的阅读!希望分享的内容对大家有帮助,更多相关知识,欢迎关注丸趣 TV 行业资讯频道!
向 AI 问一下细节


